You may have seen some recent announcements on the Umbrella Network Device API. What’s really cool about this new API, is that it can make pointing DNS to Umbrella even easier while at the same time providing additional attribution. Just take a look at the recent integration we did with Meraki, which enables easy and fast Umbrella deployment across a wireless network. You can point thousands of Cisco Meraki MRs to Umbrella in a matter of minutes and get additional functionality such as encryption of DNS traffic from the MR to Umbrella, attribution down to SSID, and even private IP!
I’m happy to announce that one of our technology partners, EfficientIP, has recently done something similar leveraging this same Network Device API. I was fortunate enough to attend Efficient IP’s APAC partner kickoff event last month in Bangkok, Thailand where this new integration was discussed in detail.

This integration enables a few key capabilities:
- Allows EfficientIP and Umbrella customers to instantly point DNS to Umbrella providing rock solid DNS resolution and a first line of security against threats
- Instantly provides privacy/security by encrypting all the DNS queries from the EfficientIP appliance to the Umbrella resolvers
- Allows for more specific attribution such as the private IP address of devices behind the EfficientIP appliance
I like to look at this simply as a way of providing most of the functionality of a virtual appliance without having to deploy one!
Check out how easy it is to deploy below:
1. Link Accounts
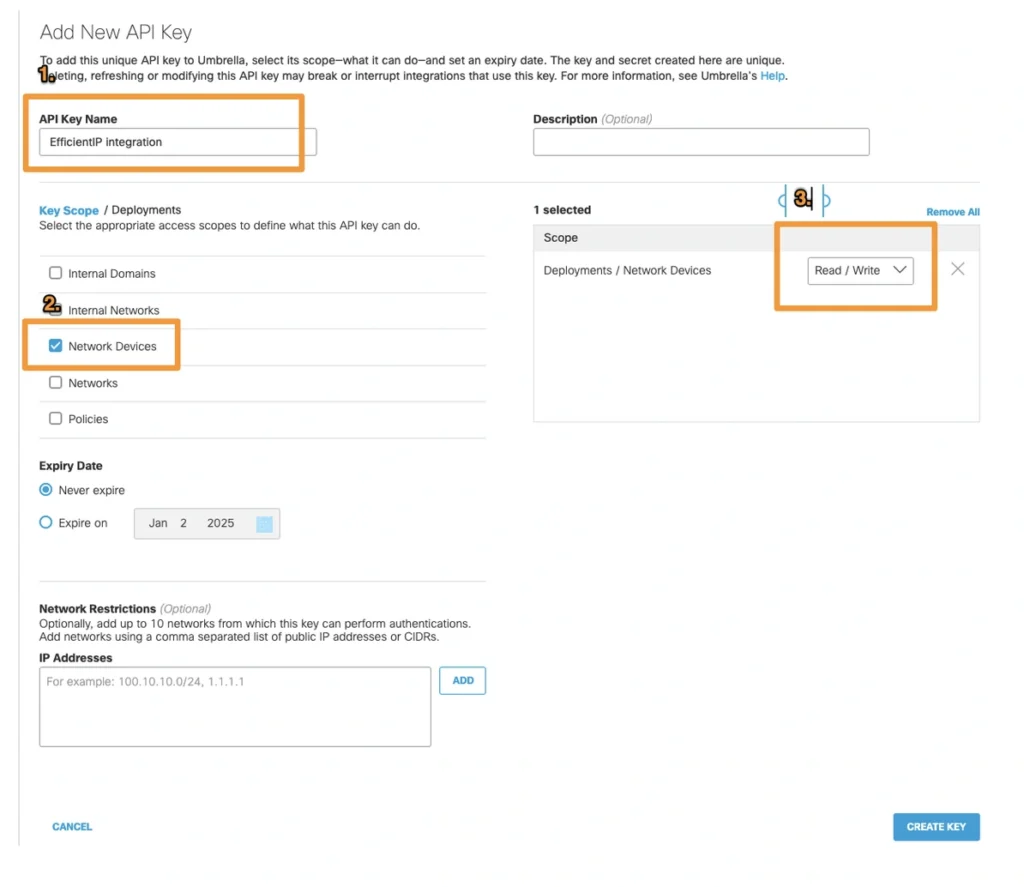
In the Umbrella dashboard, navigate to Admin – API Keys and create a new key with a relevant name, select the scope Deployments – Network Devices and Read / Write access.

Then, copy the API Key and Key Secret appearing on the next screen.
2. In a text editor, prepare the following line:
/usr/local/nessy2/script/umbrella_setup <key> <secret> <device_hostname>
Where key, and secret key are from the Umbrella Dashboard. The device_hostname is the device that will appear in the Umbrella Network devices list.
3. Paste this line in the following locations via SSH session to Solidserver:
-
- /data1/etc/namedb/global_include.conf
- /data1/etc/namedb/options_include.conf after the line
listen-on { !127.0.1.0/24; any ; }; - /etc/rc.conf
- Change dnscrypt_proxy_enable=”YES”
- Add the following as the last line in the file:
ifconfig_lo0_alias53=”inet 127.0.1.53 netmask 255.0.0.0”
4. Login to Solidserver UI
Go to (1) DNS (2) Servers (3) Select the appropriate caching DNS server.
Right click the Solidserver DNS and click properties.

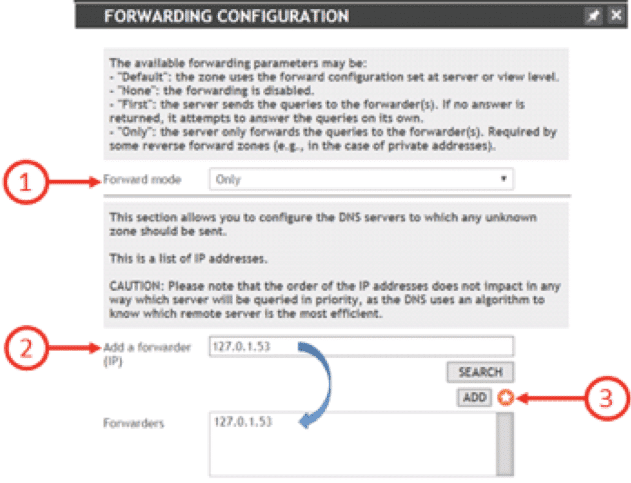
5. Click the Edit button under the forwarding tab

6. On the pop up window, click Only under Forwarder Mode.
Type 127.0.1.53 under Forwarder IP.
Click Add.
Click OK once.

7. Click the administration tab and reboot the appliance.
8. You will see the successful registration of the Solidserver in the Umbrella portal.

9. All external DNS queries can be observed through the Umbrella portal with additional attribution under activity report.

You’ll see this includes the name of the EfficientIP appliance, the DNS query being made, and the internal IP which made the request.
You can learn more about this integration on EfficientIP’s Umbrella integration page.
